Astro を学んでみる(3)
本記事は、書籍「Astro フロントエンド開発の教科書」によるAstroの勉強、3回目です。
記事内のコードは書籍のものではなく、独自に作成しています。
第2章 Astroコーディングの基本
2.1 Astroのコンポーネントと基本構文
Astroコンポーネントの基本構造について
---

---

<div id="container">

</div>

<style>

</style>
---で囲まれた部分がスクリプトを記述します。---は、コードフェンスと呼びます。
次にHTMLタグを記述します。
最後にCSSを記述します。
拡張子は.astroとなります。
2.2 Astroコンポーネントでの変数の表示
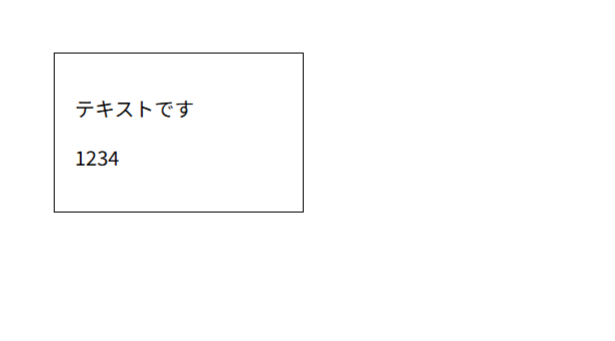
変数を定義し、表示させてみます。
---
const text: string = "テキストです";
const num1: number = 1234;
---

<div class="container">
    <p>{text}</p>
    <p>{num1}</p>
</div>

<style>
    .container {
        border: 1px solid #000;
        padding: 1em;
    }
</style>
この例では、string型の変数と、数値型の変数をpタグ内で表示させています。
TypeScriptで定義した変数をHTML内で利用するには、波括弧を使います。
あと、なんとなくCSSで装飾しています。
2.3 Astroコンポーネントでの制御構文
制御構文として、まずはif、if-else、if-elseの入れ子を試します。
---
const textTrue: string = "trueテキストです";
const textFalse: string = "falseテキストです";
const flag1: boolean = true;
const flag2: boolean = false;
---

<div class="container">
    <section>
        <h2>分岐構文(if文の変わり)で真の場合</h2>
        {
            flag1 && <p>{textTrue}</p>
        }
    </section>
    <section>
        <h2>分岐構文(if-else文の変わり)で真の場合</h2>
        {
            flag1
            ?
            <p>{textTrue}</p>
            :
            <p>{textFalse}</p>
        }
    </section>
    <section>
        <h2>分岐構文(if-else文の変わり)で偽の場合</h2>
        {
            flag2
            ?
            <p>{textTrue}</p>
            :
            <p>{textFalse}</p>
        }
    </section>
    <section>
        <h2>分岐構文(if-else文の変わり)で入れ子</h2>
        {
            false
            ?
                true
                ?
                <p>1. {textTrue}</p>
                :
                <p>2. {textFalse}</p>
            :
                false
                ?
                <p>3. {textTrue}</p>
                :
                <p>4. {textFalse}</p>
        }
    </section>
</div>

<style>
    .container {
        border: 1px solid #000;
        padding: 1em;
    }
    section {
        border: 1px dashed #ccc;
        padding: 0.5em;
    }
    p {
        margin-left: 1em;
    }
</style>
結果は下のようになりました。

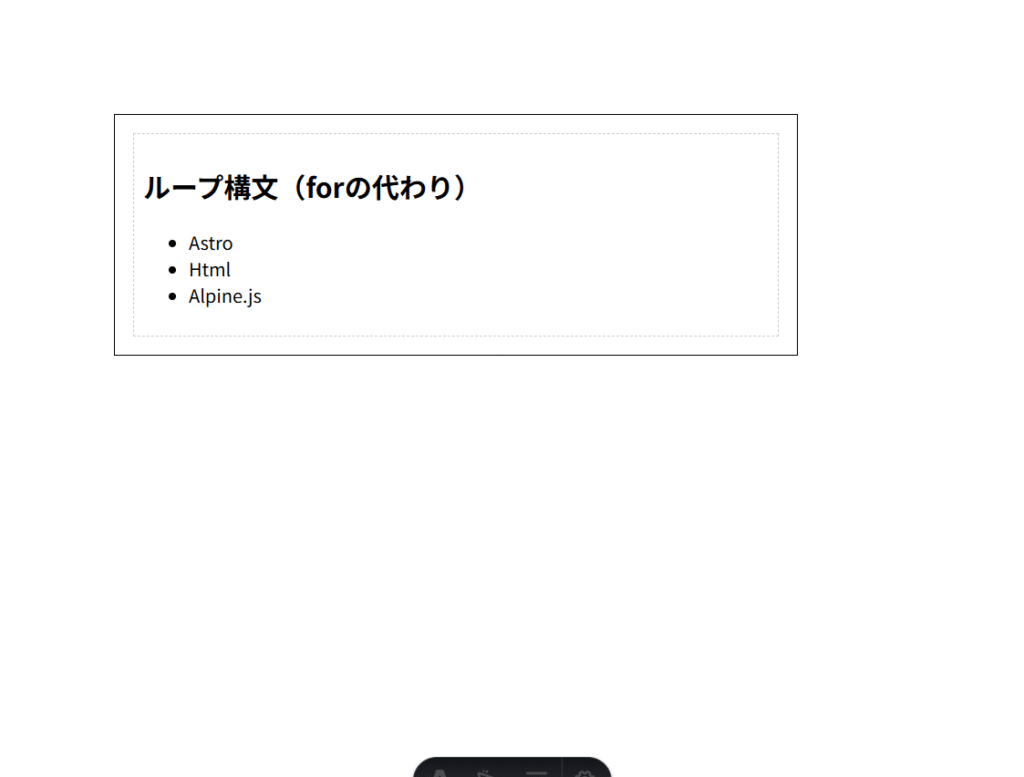
続いて、ループについて
---
const sampleArray = ['Astro', 'Html', 'Alpine.js'];
---

<div class="container">
    <section>
        <h2>ループ構文(forの代わり)</h2>
        <ul>
        {
            sampleArray.map(
                (item) => (
                    <li>{item}</li>
                )
            )
        }
        </ul>
    </section>
</div>

<style>
    .container {
        border: 1px solid #000;
        padding: 1em;
    }
    section {
        border: 1px dashed #ccc;
        padding: 0.5em;
    }
    p {
        margin-left: 1em;
    }
</style>
結果は下の画像となります。
\ 最新情報をチェック /